Friday, November 28, 2008

SIZING UP YOUR STREAM FOR HYDRO POWER

The huge variation in stream flows during a season make exact measurements difficult and un-necessary. We experience 500 to 1 in a typical season, and I have seen 5000 X more water than typical low flows. An existing dam, batter board wier or even a place in the stream where all the water is flowing through a fairly constant depth channel or puddle will do to make observations and measurements that are detailed below. I think a computerized data logging setup is ideal but over kill. It is also likely to go down stream in the first big storm. And if you are lucky enough to experience a 100 year event you'll not only lose your equipment and maybe your dam, but you will see first hand what your intake structure has to be built to withstand! And yes, that wooden flume is temporary / test. It will be upgraded to stone (for aesthetics) and concrete for strength and durability. Look at the live webcam on the intake
http://powershack.shacknet.nu:1026/


Why measure something that varies sooo much so exactly? Any experienced hydrologist or keen long time observer of a stream can tell you the 'design flow' to use for your micro hydro setup. A hydrologist or you could determine the watershed area by studying Google earth. The watershed area and the number and size of the lakes and reservoirs tells you a lot about your stream or river. Our watershed is only 1.5 square miles and contains only one 2 acre pond. Our rainfall data shows about 50 inches / year, another figure to add into your considerations. Then you should try to determine (by a few measurements throughout a year) 'Q95' , the Quantity of water flow that is exceeded 95% of the time. So only 5% of the time there is less water and you won't be able to run your system effectively and leave enough water for the fish.


Another useful figure to estimate is 'Q50' , the quantity of water exceeded half the time throughout a year. This is the upper limit on your design flow and you will tend to spend more on bigger pipe and turbine, run for only half the year (on average) but produce the most KWhrs. This design flow should only be considered if you are grid connected and selling back. I selected Q75 (1800 Gal/min in our case) for our design flow because we run autonomous (totally off the grid) for 9 months when we have plenty of water to make about 20Kw 24/7, all of which we try to use up in 2 1/2 households.

We switch back to the local utility for a few months in the late summer when we don't use much electricity anyway, and don't have enough water to keep Q95 (150 Gal/min) flowing. My ultimate goal is to work out an arrangement with the utility company to become grid connected. Then we could 'store' the winter generated excess power in the grid and withdraw this 'stored' energy during late summer. Ideally the Utility would allow us to 'net meter' like they allow for wind, solar, and bio generated electricity. Net metering does not require any special equipment or meters, the energy flows both ways, and your existing meter runs forward and backward to keep track. But alas, the Utility in their infinite wisdom, excludes Micro Hydro from net metering. So we should all lobby to get net metering for all renewable energy. Even a cap, of say 25 KW, would be acceptable. Beyond 25 KW you could probably justify the expenses of special meters and switch gear. Now I'm Getting off topic.

Happy Hydro!
Rob

Make webcams work over long distance ethernet.


Find the WEB CAM in the picture ...
Here I used the 6X6 plastic box on its back. The camera and the clear cylindrical food storage container is mounted on the box cover, and the Home Plug Ethernet Switch and camera power supply are all in the box. Just a pair of #18 wires powers the whole thing and carries the ethernet video signal back to the house and the internet. The camera works even on the coldest days (-5° F so far) because of the small amount of heat generated by the power supplies. Cost: IP camera-$80, One Home Plug-$50, Carlon 6X6 box and clear food container- $20. The other end at the house costs about $70 plus 1000 feet of Cat 5 wire. The most expensive part is trenching and plastic conduit. But if you do it by hand you won't need that workout at the gym for a long time :)


POWER YOUR WEBCAMS AND SEND STREAMING VIDEO THOUSANDS OF FEET OVER ZIPCORD!

Yea, these little webcams, IP cams or internet cameras, are cheap (<$100). What costs is hooking them up using fiber optics over long distances. Wireless does not work over more than a few hundred feet and line of sight. You still have to run 120VAC to them, so why not send the streaming video over the same power wires? I've got 4 running now, the one in the power house is 1400' away! That one is just aimed at the circuit monitor meters.


These web-cams have web-servers built-in. That means they act just like a computer on the internet and you don't need a computer running all the time. The camera all by itself can send its imagery to anyone that logs on and requests it. You can set up the camera with user names and passwords, and you can access the camera from anywhere on the internet. I did have to learn a lot about IP addresses, port forwarding and such to get the first one to work. It took me a while to figure it all out, and then I went out and bought a different brand of camera and it was like I had to re learn everything all over again because it was all slightly different and it did not help that the manual was in Chinese or a very rough translation there-of.


Try http://www.powershack.shacknet.nu:1027/ Use Guest login. You'll be looking at the 2 Square D Power Monitors set to read out Amps @ 500V and 3 mirrors, the lower left mirror shows the control valve position, vertical black line is wide open, 45° is shut down to minimum power. The wide angle mirror gives a view of the inside of the power house. Also try the intake cam at http://powershack.shacknet.nu:1026/ (during daylight hours- will have night lights soon.) The biggest challenge was how to get ethernet to work at 1400 feet distances and at the same time get power to the camera. Now I had already installed cat 5 wire all the way to the powerhouse, but when I tried to connect the camera in the power house to my computer 1400' away at home I got nothing, even though it worked fine when there was anything less than about 500' of cat 5. I solved that problem by buying a pair of Netgear 'HomePlugs' for about $100. These things are designed to plug into any 120VAC outlet and have 4 ethernet connectors. They are intended for extending your ethernet network in a home by using the existing 120VAC power wiring in a house. So you plug one in the wall in the living room, plug your computer in to it, plug another one in, say in the den at the other end of the house, and plug in the second computer or any ethernet device.


Now I could not use the power line going between the power house and my house because it is 500VAC. So I paralleled 2 pairs in the cat 5 wire, and with some fuses and filtering essentially plugged the Cat 5 into 120VAC at the house, and a HomePlug at each end. (see drawing above for details) At the powerhouse end I also connected the wall wart that powers the webcam to the 120VAC that also powered the HomePlug, and then just plug in the ethernet cable from webcam to HomePlug. With this setup you could run 16 guage zip cord thousands of feet , power the webcam at the far end and get video streams at up to 85 Mb/sec. back over plain old zip cord. Some models of HomePlug go up to 250Mb/sec. !


The only other option I came across in my research was to run fiber-optic, but that would have cost 10 times what this setup cost me. In the mean time I have added 3 more webcams ( and 3 more HomePlugs) all in parallel on the same doubled up pair of #22 cat 5 wires and I can't really see much degradation in speed or image quality. I have all my long distance wire underground in conduit. If you plan overhead wire you'll need to consider more fuses and surge suppressors in case of lightening strikes. Even my underground wire got enough of a surge during a recent thunder storm to blow a 1 Amp fuse, but no other damage.


Disclaimer: 120VAC is dangerous and should only be used with the proper wire in the proper conduits and with the correct fusing and ground fault protection. Only qualified persons should deal with electricity. The unqualified may be fried!


http://www.netgear.com/Products/PowerlineNetworking/PowerlineEthernetAdapters/XE104.aspx

These are the links to the NetGear hardware.

Tuesday, November 25, 2008

Dealing With High Water, Leaves, Sand, Gravel, Rocks & Ice

The most difficult part of a hydro project is building it to deal effectively with the extremes of nature. Of the various challenges nature provides the most difficult (in our situation and location) is extreme cold. When the temperature drops towards zero degrees F the water running over the rocks becomes super cooled ( below 32°F). It turns to slush and plugs up any trash rack in the way. Compare this summer low water scene looking down stream into the intake flume and trash rack to the high water and winter scenes.


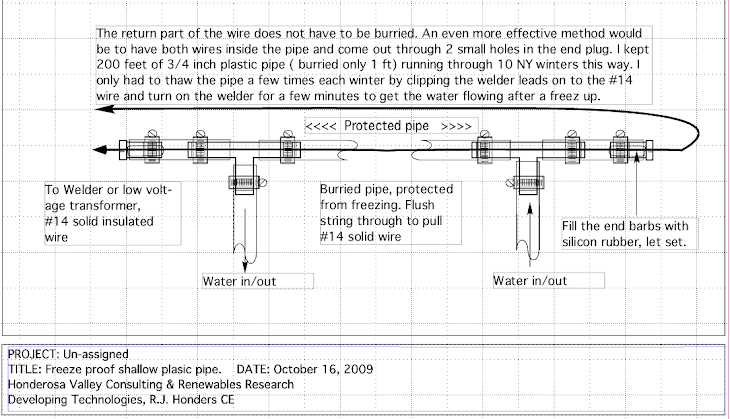
The slush completely blocks the trash rack and any liquid water runs around the intake. This shot is looking up stream, note the big rock that guides the water directly into the flume. Since there is very little debris in the slushy water I removed both the primary and secondary self cleaning trash racks to keep things flowing. With no metal parts for ice to build up on and attach itself, I was able to keep it flowing down the 550' of 8 inch steel penstock, but only after adding some insulation to the penstock where it could not be buried. This year I added a small (1/2") buried plastic pipe that feeds 45°F water, in winter, from a spring a 1/2 mile away and 150 feet up. This warm water squirts out and upstream from the intake at 1.5 gal/min. We'll see if it helps keep things flowing. I need a dubious emoticon here. It sure can't hurt. I'll report back.


The insulation I used is only about a quarter inch of foam, ordinarily used to seal between a footing and the sill plate of a building. It comes in 50 ft X 8 inch rolls at building supply depots. To protect the foam I spiral wrapped it with high quality roofing underlayment, and coated that with rubberized roofing compound. To make the spiral wrapping process manageable I cut the 3 ft rolls in half. Start the wrapping at the bottom and overlap a couple of inches so it sheds water. Note the power and control conduits are strapped to the penstock with stainless straps and are included in the insulation.


This is a picture of the first year freeze-up being thawed out. The ice covered dam is visible in the distance. This freeze-up probably would not have happened if the water had continued to flow into the flume, but I suspect that the trash rack gradually reduced the water flow to a standstill causing everything to freeze.


Here is a picture looking down the 200 foot waterfall in winter. There is actually water flowing under there! Note the as yet un-insulated penstock upper left going slightly down hill.


This shot shows the (temporary/test) intake box that has baffles and screens to separate the water from gravel, leaves etc. The flume is not yet installed. The gravel dump valve oulet is directly under the '24'. The penstock is right under the '7' and there is an 8 inch butterfly valve stem visible just above the '2'. See the drawing posted for more detail. This intake structure, being successful, will be made more permanent with concrete before the wood disintegrates. I hope it will last a few more seasons as is.
Try this link to a live webcam monitoring the intake, http://powershack.shacknet.nu:1026/

Click on Guest visit. Will have night lighting soon.